
Pastel
Pastel is a difficult medium that I've worked hard to perfect over many years - below, I'll share everything that I know about it, and the steps that I've taken to maximize its potential.
Pastel also has a tendency to experience mold growth, which can be very problematic. I've included a section about my suggestions for preventing and treating mold on your artwork - you can click HERE to skip ahead to that section.
- My Approach to Pastel -
For pastel, I work on darkened paper, anywhere from medium-grey to black. A dark paper allows pastel colors to be seen for what they really are. A bright yellow, for instance, will appear quite bright indeed when applied to dark paper - whereas the same color applied to a white surface will look entirely different, perhaps even dark, in contrast to the white background. This circumstance makes dark papers preferable for pastel, especially since pastel is very opaque - this opacity typically ensures that any underlying tone is ultimately hidden from view by the time that the work is finished, especially in the case of a working method like my own, which involves the dense layering of many colors. For this reason, I never bother to apply colored tones on my paper, but only simple grey or black. I do know some artists, however, who use pastel in a more open method, with less complete coverage, allowing colored tones or watercolor washes to show through from below - this is an equally valid approach, but simply not the one that I employ in my own work.
Except in the very early stages of a painting, I try to avoid smudging the pigment with my fingers or any other tool, since smudging tends to produce thin, muddied colors. There is generally no smudging at all in the later stages of the work, where color mixing is achieved exclusively through a painstaking process of carefully cross-hatching and interweaving the marks of color into one another, building layer upon layer. This requires a very delicate touch.
I never apply fixatives to the finished work, since these liquid sprays greatly alter the appearance of pastels, and not for the better - the colors tend to turn much darker than intended, subtle colors and values become lost, and soft edges are made much sharper. This is apparently because the particles of pigment are compacted by the action of the liquid, totally changing their reflective properties and subtle interactions with one another. The same effect will occur if the work is sprayed with ordinary water. Without the use of fixative, of course, pastels remain perpetually fragile - they are best protected behind glass framing, and should be stored and transported in boxes until finally secured in their frames. There will always be the potential for some excess pigment to fall from the surface of the work during handling, but this tends to be very limited and does not noticeably change the appearance of the work.
Although I've used both the Rembrandt and Schminke brands of pastel in the past, and still use them for some purposes, I've primarily become a fan of the Sennelier line of pastels since 2008. I now own a Sennelier box-set of 525 colors, and about 90% of the work gets done with these. Sennelier is distinctive for its range of very dark colors, which tend to be difficult to acquire in pastel. The darker range of Sennelier has significantly enhanced the quality of my pastel work by expanding the value range of my pictures in that medium.
- My Custom-prepared Paper Surfaces -
Another material upgrade that has revolutionized my pastel work is the creation of custom paper surfaces. In my experience, pastel can be either a joy or a horror to use, depending on the nature of the paper substrate. In the past, I've used a black print-making paper called Arches Cover, and I've also tried a variety of "sandpapers" and other products that are supposed to be intended for pastel. But, finding all of these to be unsatisfactory for one reason or another, I began preparing my own paper surfaces to produce exactly the sort of feel and durability that I want. Achieving this requires a procedure that I arrived at through years of trial and error.
I initially experimented with a mixture of black acrylic gesso and finely ground lava pumice, generously thinned with water - a few of my pictures, like "Firebreather," were successfully rendered on such a surface. But this method was fickle, often delivering poor results if I happened to deviate from the exact formulation by even the slightest degree, since the acrylic gesso can easily produce a hard, resistant surface if it's applied too thickly.
Instead, after experimenting with everything from wax to plaster, I eventually discovered the benefit of rabbit-skin glue, a substance traditionally used by oil painters in the priming of canvas. This glue proved to be the solution to my pastel-surface problems. Below, I'll describe the entire process of preparing the paper, which involves several key steps even before the glue is applied..
I use 300-pound Fabriano hot-press watercolor paper. Hot-press paper is necessary for its uniformly smooth surface. I avoid cold-press because of its rugged texture - since I do detailed work, I want the surface to be as consistently smooth as possible. For my purposes, 300-pound paper is much to be preferred over thinner, lighter-weight papers because of its extra durability and relatively greater resistance to curling and buckling.
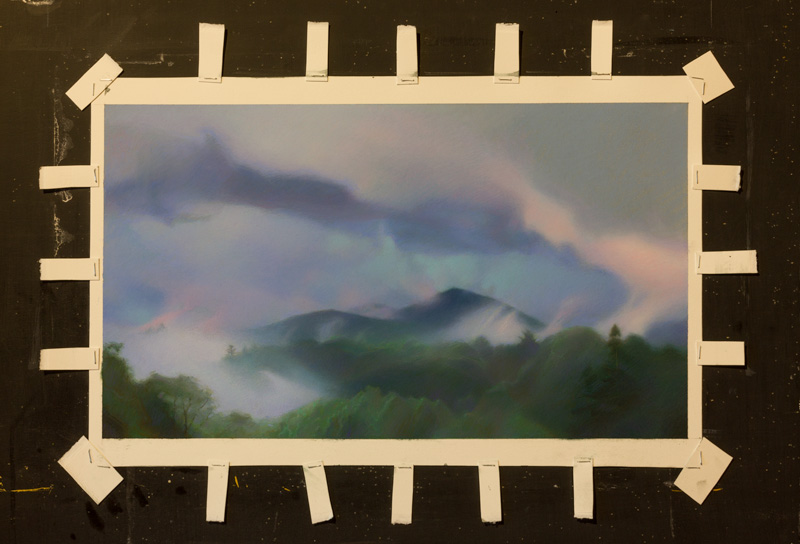
I soak the paper in water for at least 30 minutes, which causes it to expand, and then I staple it to a board while still wet - a practice familiar to watercolorists - to stretch the paper and render it perfectly flat when it dries. Although it's not absolutely necessary, I generally try to keep the paper stapled to the same board throughout the entire process of priming the paper and producing the finished work, to ensure that it remains flat and secure right up until the time that the work is ready to be framed.
I find it useful to place a small tab of paper underneath each staple as I secure the soaked paper to the drawing board. This makes it much easier to remove the staples when the work is finished; otherwise, they can be miserably difficult to pull up, resulting in awkward struggles that can endanger the fragile work - one careless slip with a tool can be the end of a painting that took weeks to accomplish. Instead, simply placing a tab of paper between the staple and the work allows the staples to be removed safely and easily simply by pulling up on the tab. Even if an especially stubborn staple refuses to come up completely, the tab method usually loosens it enough to allow it to be extracted with needle-nose pliers with little effort. Here's what my paper tabs typically look like:
These tabs need to be made of durable paper, of course, so I use the same 300-lb paper that I work on - I always have discarded scraps of that stuff readily available, so I just cut them up into these tabs about an inch wide and maybe two or three inches long. I keep dozens of them in a bag, ready for use at any moment, and I apply just enough staples to ensure that the soaked paper will stretch tight and flat as it dries. Below is a photo of a finished pastel, "Passing Storm," with the stapled tabs holding it in place on my drawing board:
Once the paper is secure and has dried completely, I can begin to prepare the surface. I'm after a very specific kind of surface. Hot-press paper is pleasantly smooth, but it does have a sort of hard, "closed" surface - not especially receptive to a big-particle medium like pastel. I'm aiming to produce an "open" surface, although on a very tiny scale - a sort of irregular, granulated micro-texture - so I start by roughing up the paper. Once it has dried completely after soaking and stretching, I scrub the paper with medium-grit sandpaper to give the surface a soft, velvety quality. Then I follow up with fine sandpaper to reduce excess texture. The end result is smooth, lacking any troublesome holes or pits in the surface, but with a fuzzy texture similar to velveteen.
But that velveteen surface is soft and fragile - it will quickly shred and fall apart when subjected to the stress of being worked upon. So, why sand it in the first place, then? Because it seems to make a difference in the final product - I get a softer, more buttery quality from my pastels if I soften the paper first.
To give this fragile surface more strength and definition, I apply two coats of rabbit-skin glue, prepared in the traditional manner. I keep a batch of the stuff in my refrigerator, where it cools to a soft gel - since this is a perishable, animal-based product, refrigeration is necessary to keep the glue from spoiling. When needed, an amount of this gel can be warmed over the stove at very low temperature - you should never allow it to boil - until the gel melts into a very watery fluid, which it will do quite quickly.
I use a wide brush to apply a single thin coat of the glue to the entire surface of the paper. This will dry rapidly, especially if you can set it out in the sun for a few minutes.
After the first coat has fully dried, I apply a second coat, also applied in liquid form with a wide brush - but this time I mix in a couple of additional ingredients to give it more substance:
- I add a few spoonfuls of Bon Ami powder, a common household cleanser containing finely ground calcium carbonate and feldspar, both of which act as mild abrasives - these ingredients give the glue coating a little more substance and toothiness to grab and hold the pastel particles. The advantage of Bon Ami over other powders is that it does not contain bleach, acid or other chemicals commonly found in household cleansers, which would be destructive to the work.
- I also add a generous amount of black watercolor pigment, in liquid form, in order to stain the white paper with a darker tone. I formerly tried using India ink for this purpose, but found that this ink can contribute to the formation of a resistant surface that will repel the adhesion of the pastel pigment. Instead, I now use any cheap watercolor pigment - it doesn't need to be anything fancy. I use the darkest pigment that I can get, since it will be lightened considerably when added with the Bon Ami powder. The result will be grey.
There is no particular recipe or ratio for the glue/powder/pigment mixture - I simply judge it by appearance. It should be neither too thick nor too thin, and it should definitely be dark enough to stain the paper thoroughly. I try to spread the grey tone as consistently as possible across the surface, but it doesn't really need to be perfect - the tone is temporarily useful during the process of painting, but will ultimately be covered over entirely by opaque pastel pigments.
In the end, I have a velveteen foundation covered with one coat of pure rabbit-skin glue followed by one coat of the darkened glue/powder mixture. Once completely dry, the result is a coating that gives some extra durability to the paper, while retaining the paper's underlying softness.
If done propertly, this results in the best pastel substrate that I've worked on. The best thing about the glue priming is that it's strong enough to hold up against the abuse of pastel work, but it has an open, granulated surface that receives the pigment well. It's the very opposite of the sort of hard, glassy surfaces that repel pastel. I think that the dry glue actually crumbles and breaks down under the constant friction of the pastels rubbing against it. Unlike the varieties of hard pastel papers or boards that are commercially available, my own custom surface rolls with the punches - it works precisely because it's not hard, gritty or resistant. It breaks away and crumbles into a powder much like the pastel itself, and the two just blend together as the work proceeds. That allows for a smoother, more buttery pastel stroke, and for better adhesion of the pigment.
Another benefit of this technique is the unique ability to remove an entire portion of a painting and then rebuild it from scratch. The need to do this often presents itself in pastel. For instance, if I've overworked an area of a picture, the pigments can get compacted very tightly to form a hard surface that resists further work. Or, perhaps I simply feel inclined to reconsider some aspect of a troublesome painting, and might decide to change the picture dramatically. When faced with such circumstances, my custom surface allows me to use sandpaper to sand off an entire portion of a well-developed painting, then re-prime it with a new coat of glue. I just rub some of the glue mixture into the sanded area with my fingers, let it dry, and then I'm ready to work again, rebuilding the painting from the ground up. Since pastels are opaque, I can seamlessly blend the patched area into the rest of the painting. I've done as many as four or five of these patches in the same part of a painting before finally achieving the desired result, without leaving any tell-tale signs of the procedure. No more dead-ends in pastel - now, I can turn around and change direction in the work, to save a painting that might otherwise have been a total loss.
Once the paper surface has been prepared, I use a ruler to define the edges of the work as accurately as possible, marking them with a pencil. Then I apply masking tape along the edges - it's the oldest trick in the book: when the work is finished, the tape is removed to reveal a precise, clean edge.
- Mold Growth on Pastels -
My suggestions for treatment and prevention
Mold loves pastel. Dense, fluffy, mineral-rich layers of pastel are basically like potting soil for mold. I've been dealing with this problem for years, and it almost turned me away from the use of the pastel medium altogether. There are surprisingly few resources for learning about the problem and its possible solutions, so I've had to learn everything that I know about it through trial-and-error. I'm happy to report that I have successfully killed mold on pastel pictures without harming the artwork, and the process is really quite simple. There are also steps that you can take to prevent mold in the first place.
I know that the following approach is effective, because I've been monitoring its progress over a period of years with a particular work of art that had a persistent mold problem. I recently had a chance to revisit the painting that I treated in this way, and the mold was gone, even after two years following the treatment.
If you're an owner of pastel artwork, I've also included some recommendations for discouraging mold growth through the proper display and maintenance of the work in your home (click HERE if you'd like to skip ahead to that section).
First, if you're trying to get rid of mold that you've found on a pastel painting, here's what definitely DOESNT' work: I initially tried to scrape the mold away, then carefully vacuum the surface, and then repaint the affected areas. But this did nothing - within a period of months, the mold was back, and worse than ever. I'm sure that scraping the mold away only releases tons of spores, which go airborne and then lodge themselves among the pastel particles, and vacuuming is not sufficiently reliable for removing them all. So don't bother wasting your time with that strategy.
Instead, I spray the work with a common anti-fungal spray, normally used for the treatment of athlete's foot. I've used Tinactin successfully in the past, so I can vouch for that, although I suppose that any brand of anti-fungal spray would suffice. You must get the CLEAR SPRAY variety of this product - there are others that have a white powdery ingredient, which isn't good for spraying all over your artwork, of course. But you can lightly spray the clear stuff onto your work safely.
I typically don't like to apply fixatives to my pastels because the liquid spray changes the appearance of the work - but I believe that the Tinactin's liquid ingredient is mostly alcohol or some similar thing that evaporates very quickly. The rapid evaporation seems to prevent the liquid from harming the appearance of the work, as long as you apply it lightly. I've seen fluffy growths of mold shrink away at the first touch of this spray. Just to be sure, I give the affected areas a spray from this product twice a day for a week (which is the recommended dose for curing athlete's foot). It may not really be necessary to do it for so many days, but I figure that it's better to be safe.
Just for good measure, I also use a germicidal ultraviolet light. This is a plastic wand with a UV bulb. Here's one just like the one that I own:
Mine has worked well, although some of the Amazon reviews claim that they did not work or were broken. Either this product, or something similar from a different brand, should be fine. Since its action occurs on a microscopic level, I can't say for certain that the light is actually killing anything, but apparently these devices are known to be effective in the destruction of bacteria and mold spores, and are used to sterilize flat surfaces in hospitals, etc.
I use this wand at very close-proximity to the work - within one or two inches - and I slowly drift across the whole surface of the work, allowing at least 20 or 30 seconds of direct exposure for each area within reach of the light. In this way, it can take five or ten minutes to give an entire picture reasonable exposure to the light. I wear UV-filtering sunglasses while using this, by the way, and would recommend the same for you.
I recommend using both the anti-fungal spray and the ultraviolet light, just to be doubly sure that you're killing all of the spores.
You can also use either method, or both, as preventive medicine, too. Whenever possible, I treat all of my pastels with the UV light just before sealing them into their frames. You could also try spraying them lightly with Tinactin both during the work and after completion. I would recommend that you experiment with this a little first before spraying finished artwork.
There may be even better methods for dealing with the problem, but this is the best advice that I can offer from personal experience so far.
- Suggestions for the Archival Display of Pastels -
If you're simply displaying pastel artwork that you own, here are some suggestions that may help to discourage mold growth and other potential problems.
A humid climate is obviously a problem, but can be easily remedied with air-conditioning. I recently visited a client in Washington D.C. who owns many of my pastels. D.C. is quite humid in the summer, but the air in the client's home is continuously conditioned by a central-air unit, so the interior of the home is dry - I found that all of the pastels on display there were perfectly free from any mold growth, even after many years. I have no doubt that the air-conditioning accounts for the excellent preservation of these pictures, and it's probably the single best thing that you can do for pastel artwork
The nature of the display wall may also be a factor influencing the growth of mold. It's best to avoid hanging the work on outer walls of the home - walls with an exterior side exposed to the sun and the elements. These walls experience stronger changes in temperature and moisture throughout the day, and will extend these changes to artwork hanging against them. This circumstance may encourage mold growth.
Pastels are best displayed in a bright area of the home. Mold does not appreciate bright conditions. Lots of ambient sunlight is very good - but you should keep in mind that direct exposure to sunlight can be damaging to the work also. Repeated, long-term exposure to sunlight may contribute to some fading of the colors of the artwork over time. Potentially even worse, the heat from a beam of sunlight, if it strikes the work directly, can cause the paper to expand as it warms - since it's typically secured in the frame along all four sides, the expanding paper has no choice but to bulge upward in the middle, possibly even far enough to touch the interior surface of the framing glass. The interior of the glass can develop a spot of condensed moisture when struck by direct sunlight, and it would be devastating for the work to come into contact with that moisture. For this reason, I paint on very thick, rigid paper that resists buckling in the frame. Nevertheless, it's always best to avoid exposing the work to direct sunlight whenever possible.